

Creating Bids & its Evaluation
General
The Procurement module of Axia SmartCloud® streamlines purchasing process, from creating competitive bid strategies to evaluating vendor quotes with industry-standard practices. Designed for efficiency and compliance, this feature set enables users to manage Purchase Requisitions (PRs) by deciding single or multiple bids, mapping pre-qualified vendors to bid slates, sending them Requests for Quotation (RFQs) and evaluating their quotes using weighted criteria for optimal decision-making. Integrated workflows ensure transparency, traceability and security, making procurement seamless for businesses of all sizes.
AT A GLANCE
- Bid Creation:
Strategize single or multiple bids per requisitions based on value, urgency, or compliance needs. - Bid Slate & RFQ:
Map vendors, create bid slate, and send RFQs securely via email for competitive quotes. - Evaluation & Decision:
Input unit rates, apply industry-standard weighted scoring and route evaluations for approval with full audit trails.
Procurement Users
Learn more about User Management on Axia SmartCloud
Axia SmartCloud® Role-Based Access Control (RBAC) ensures that users can only perform actions appropriate to their responsibilities.
Role1 | Role2 | Role3 | Role4 | Role5 | Role6 | Role7 | |
Create requisition | Approves requisition | Set-up bid slate, send RFQ | Receive RFQ, upload to system | Enter data & evaluate | Approve Evaluation | Create PO | |
User | Manager | Buyer | Buyer | Special | Manager | Buyer | |
User : Anyone who has access can generate request.
Manager : Special privilege mapped by department, division & enterprise.
Buyer : Procurement personnel
Integration with Overall Procurement Feature
Integration of a Bids system with the Procurement Function managed by the Supply Chain team or Purchasing Department is a key part of streamlining the end-to-end procurement lifecycle.
An integration diagram is provided below:
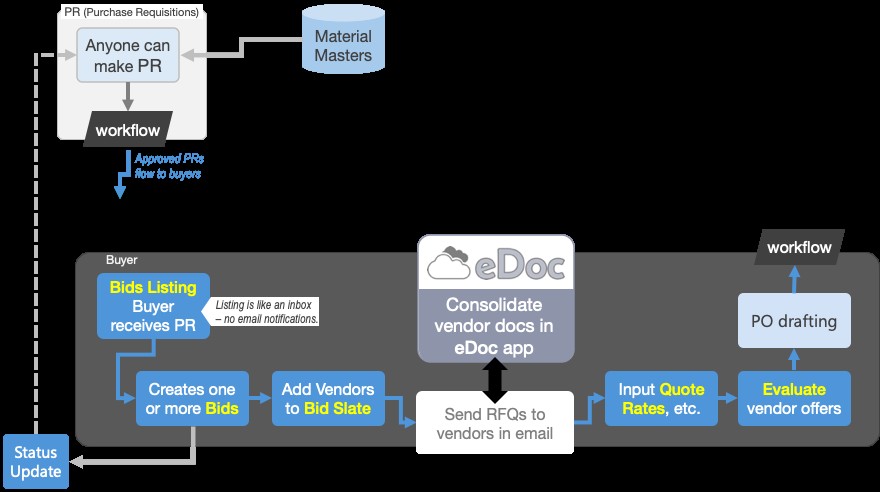
Image 1.0: Overall material sourcing and warehousing activity
This integration begins when an employee/department identify a need for goods orservices and initiates a requisition through Axia SmartCloud® digital platform. The system captures relevant details such as item specifications, quantity, required date and justification. Once submitted, the requisition follows a predefined approval workflow, ensuring that it is reviewed and authorised by the appropriate authorities, such as department heads or finance controllers.
Once the requisition is approved, it becomes visible to the Procurement Department, which then takes over the procurement process. The purchasing team reviews the requisition for completeness and compliance with procurement policies. They may consolidate similar requisitions to leverage bulk purchasing advantages.
Based on the approved request, Procurement Department team selects suitable vendors from a pre-approved list facilitated by Axia’s integrated supplier management tools. This step ensures that procurement decisions are cost-effective and aligned with organisational standards.
Accessing Material Requisition function
When you login to Axia platform, it typically routes you to its home page.
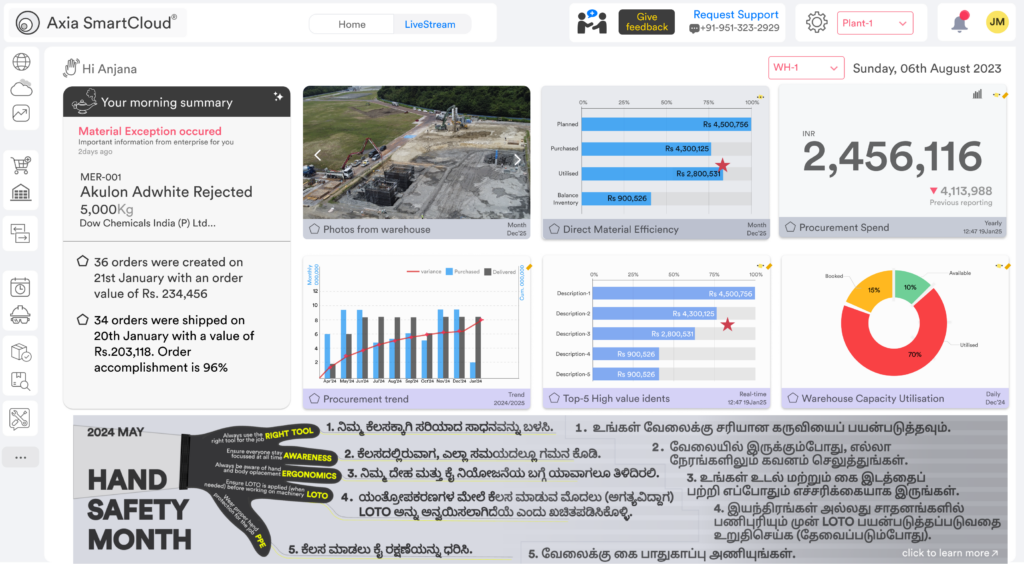
Image 1.1: Illustration of Axia homepage.
Content displayed you can be different based on your role and industry background.

Procurement feature is accessible from shopping cart icon in Axia menu of the web app. You will land in procurement home and choose Bids or Purchase Orders card based on your need.

Image 1.3: Options for Procurement
Bids : Lists all bids chronologically.
Orders : List of all Purchase Orders chronologically.
Bid listing:
The listing page provides a centralized view of all requisitions, bids and purchase orders with its status. It helps users track, manage, and act on procurement requests efficiently.
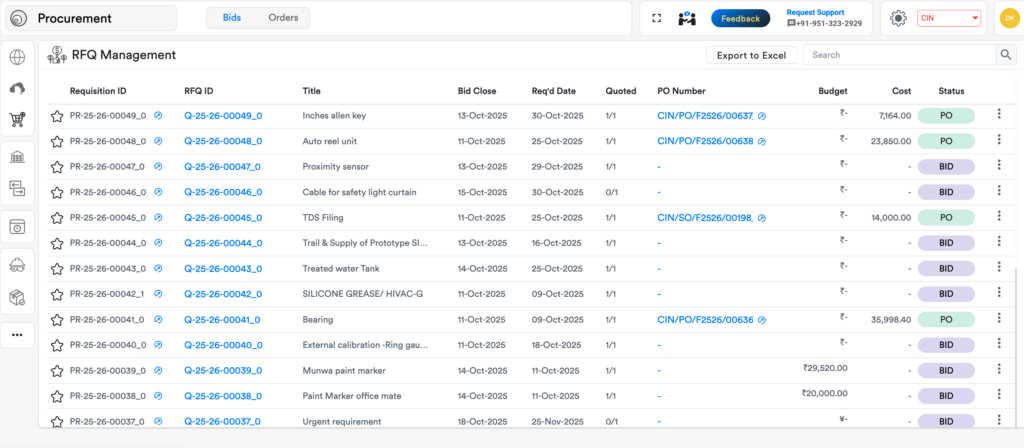
Image 1.4: Bid header
Displays a list of all purchase requisitions with key details such as:
Requisition ID : A unique id for each request.
RFQ ID : Unique id for each bid.
Title : A short, meaningful title that summarizes the purpose.
Disc/Department : Department from which requestion originated.
Bid Close : Last date on which quotes can be accepted from vendors.
Req’d Date : Required date on which material/service delivery is needed.
Quoted : Number of vendors quoted/invited (1/2 – 1 quoted out of 2)
PO Number : PO document number if it is already created.
Cost : Purchase cost of the requisition/bid/PO Number.
Status : Indicates a pre-set status of the requisition
💡Tip: Use a clear and consistent naming convention for titles to make tracking easier.
Search & Filter
Use the search bar to find requisitions by ID, approver name, or keywords.
Apply filters by date range, department, status or amount to narrow down results.
Action Buttons
View : Click blue links in the listing to see he full details of a requisition.
Export : Download the list in Excel or PDF format for reporting. (A report for approval pending item can be downloaded for coordination).
Status Indicators
Color-coded tags help quickly identify the current state of each requisition.
Pagination & Display Settings
Navigate through pages using the pagination controls. When you scroll down 40lines of data is displayed each time.
📌 When new requisitions for purchasing are generated by users, it will tigger a button on the screen for accessing them. Click to see new requisitions list.

Image 1.5: New requisitions alert
Bid Header:
Each header indicates a unique procurement activity.

Image 1.6: Bid header
- Discipline : Department which originated the requisition.
- Title : Title originated in requisition document for identification.
- Required Date : Date on which material/service delivery is needed.
- Person in Charge : Person responsible for the requisition
- Quotation Action : Option for buyers split requisition into multiple bids.
Quotation Action:
- Buyer may choose to proceed with single RFQ – (means all material in requisition can be supplied by one supplier without splitting into multiple supply source). This is One Requisition-One Bid approach.
- Group items for multiple RFQs – typically means, materials in one requisition cannot be supplied by one category of supplier and need to be split into multiple categories of supply source. Split items into separate RFQs based on vendor categories.
💡Notes: When action for the quotation is chosen, a bid header is generated in the database. To access it, click go to “RFQ link” that appears upon you saving the data.
Info tab
Data in info tab typically flow from the upstream requisitions. Refer to this tab for vendor preference or notes on coordination on your purchasing.
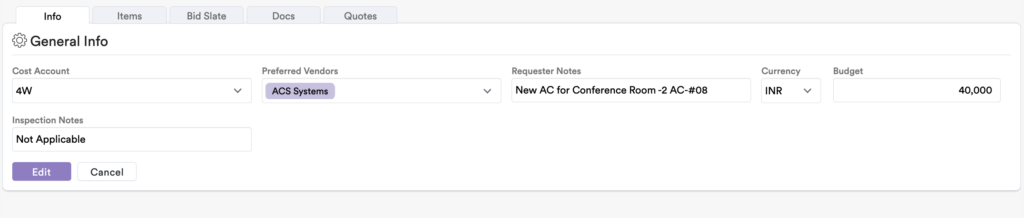
Cost account : This can be set up in the master. Contact administrator.
Preferred vendors : Indicates if requisition PIC has preference on suppliers.
Notes : Add notes to buyer that may be relevant.
Currency : Currency applicable for budget.
Budget : Indicate a budgeted amount for this purchase.
Inspection notes : Add specific inspector criteria or notes.
Items tab
Data in Items tab flows downstream from requisition. You can find the material/service items that requester added line by line in Items.

Image 1.8: Items tab
Item : Line-item number to segregate each material/service item.
Ident Code : Unique Identification of each material
Description : Description of the material (this comes automatically if material exists in master data).
Description-2 : This is a provision to add your own description to material.
Quantity : Quantity you will need
UoM : Unit of Measure which comes automatically from master.
Remarks : Add remarks to buyer that may be relevant from the Upstream requisition
RFQId’s : It is a unique reference number automatically generated by the system to identify each RFQ.
💡Notes: It is possible for buyer roles to edit or add items to Item tab.
Initiating a Purchase
Learn about initiating a purchase in Axia SmartCloud
Mapping Vendors to Bid Slate
Bid Slate helps select suppliers who will be invited to participate in a specific procurement opportunity. This ensures only relevant and qualified vendors are considered.

Image 1.9: Bid Slate
Number of Bidders : Indicates the total vendors that will participate in the bid.
Assign Vendors : Allows you to select and link vendors to the current bid.
Vendor PIC : Maps vendor’s designated contact person for the bid.
Bid Closing Date : Specifies the deadline by which vendors must submit their quotes.
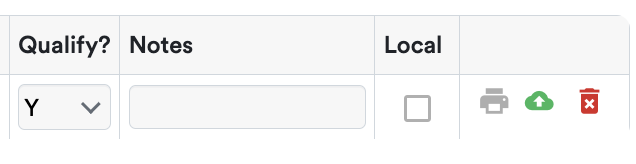
Image 1.10: Compliance Keys
Qualify? : Indicates (by flagging) whether the vendor meets the qualification criteria for the bid.
Important – Unit Rate input is possible for the vendor only after qualification.
Local : Flags whether it is necessary for the bid to consider sourcing from local vendors (who are locally based or registered in the target region).
Important – This bypasses competitiveness criteria in evaluation algorithm. Use it to manage procurement policies and compliance criteria around sourcing locally.
How to add the Vendor?
- Click “Number of Vendor” for selected count to Assign vendors participating in the bid.
- Then manually select the vendors you want to invite for the Bid, in Assign Vendors drop down (or) use search by name to find vendors.
- If needed, you can check the Local if the bid preference is for local sourcing. Make sure to add local vendors to bid slate in such cases.
- Finalise the Bid closing date & Click “Save button” to confirm your selection.
Onboarding a New Vendor
If suitable vendors are not already registered in the system, you can onboard new ones. This process ensures they meet compliance and eligibility standards before participating in bids.
- Navigate to Vendor Management console to add new vendors, fill in the vendor’s basic information.
- Supplier Company Name
- Supplier ID
- Contact Person & Email
- Tax ID / Registration Number
- Material Categories
Upload required documents (e.g., certifications, licenses, bank details). Once approved by your internal team, the vendor will be available for bidding.
 Not all roles can access vendor data. It is allowed among certain procurement roles only. Check with your administrator for details.
Sharing RFQ with vendors
An RFQ (Request for Quotation) outlines the material items or service items you need and invites vendors to submit pricing and terms. Sending it ensures vendors have all the necessary details to respond accurately. Click the Print Icon to the Generate PR document and check the preview the document. (It contains scope of supply, Technical specifications, Submission deadline, Contact details, etc.).

Image 1.11: Preview/Printing RFQ
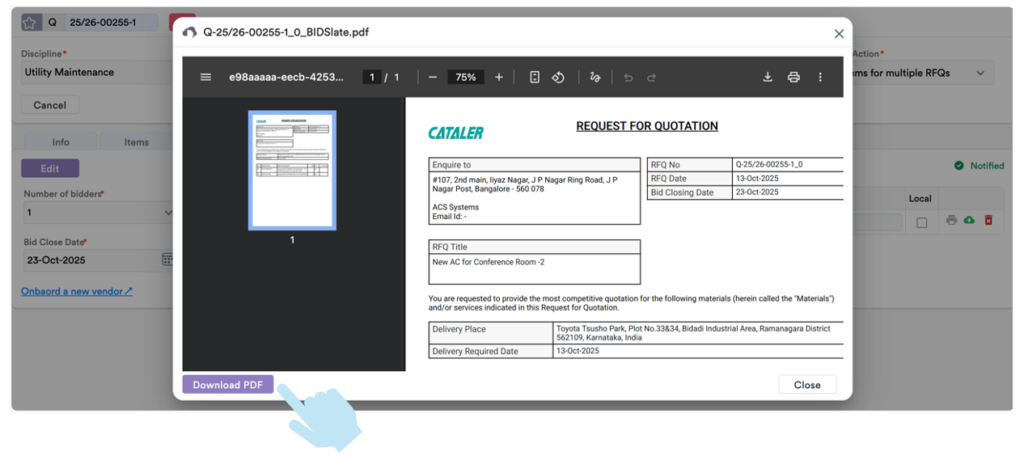
Image 1.12: Downloading RFQ for sharing
Click “Download RFQ” (PDF). Use the email vendor feature or send manually via your email client.
Handling vendor quotes
Once vendors respond to your RFQ, you may upload their quotes into the system for record and assist its evaluation. This keeps all responses organized and accessible in one place.

Image 1.13: Link to upload vendor supplied documentation
Go to relevant vendor in the bid slate and click “Upload docs” icon. Folder Path is typically predefined by administrator in BLUNET’s eDoc product. eDoc must be set-up to enable use of Doc upload feature.
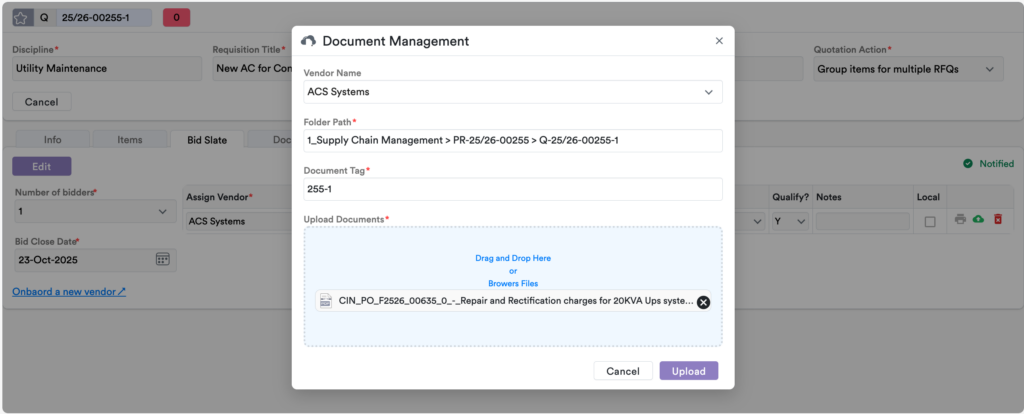
Image 1.14: Uploading vendor supplied documentation
While uploading the document, verify if the predefined folder path is accurate. After drag & drop, you can see that in documents field box. Click the “Upload” button. Select one or more files from your device.
After upload, the quote and other documents are listed in the Docs tab. It can be previewed by clicking its links.
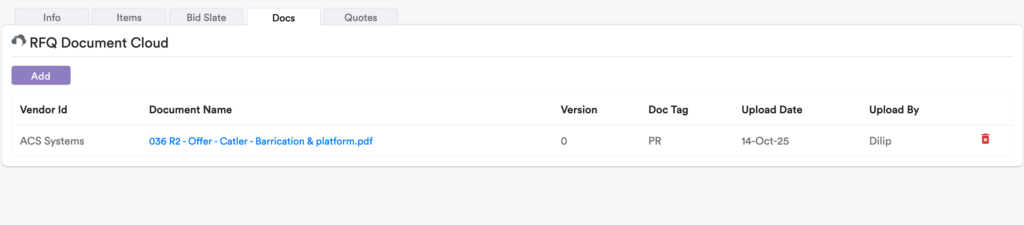
Image 1.15: Document uploaded for the specific bid
You may choose to “Notify to the Requestor” to inform availability of document from vendor for user activity.
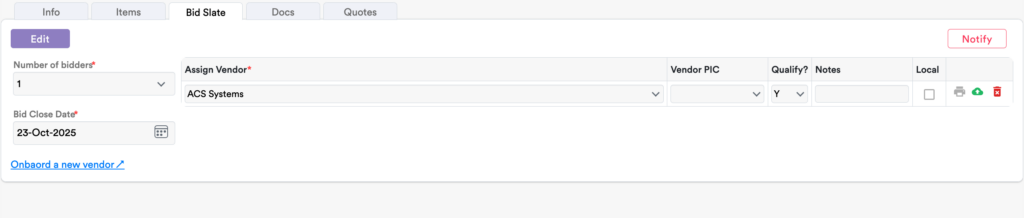
Image 1.16: Notification facility
💡Tip: Providing complete documentation at the time of bid & RFQ helps streamline the approval process, reduce back-and-forth communication and ensure faster processing by the procurement and finance teams.
Deleting documents: After uploading, it is possible to delete the uploaded documents, when required.
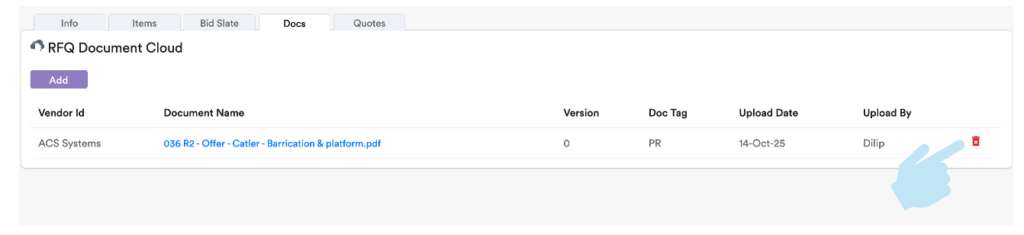
Image 1.17: Deleting document from doc tab
Evaluation Stage-1: Capture Unit Rates & Delivery Conditions into system
After quotes are received, you can start processing the information to start evaluation. It is necessary to manually input pricing and delivery terms to ensure accurate evaluation.

Image 1.18: Unit rates input
<span style=>Click the quote entry</span>, and you can see the unit price input prompt. Refer into the received quotes from Docs tab and input unit rates for each item/service line item. After all entry completed make sure the price & click the save button.
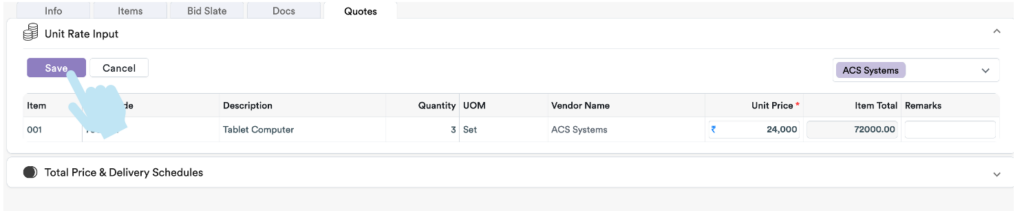
Image 1.19: Unit rates input
After Save Unit Rate Input, you need to expand “Total Price & Delivery Schedule” accordion to input the delivery information.

Image 1.20: Total Price & Delivery Schedule Accordion
Delivery Terms define the conditions under which goods or services will be delivered by the vendor (Delivery Schedule (Lead Time) & Delivery INCO Terms)
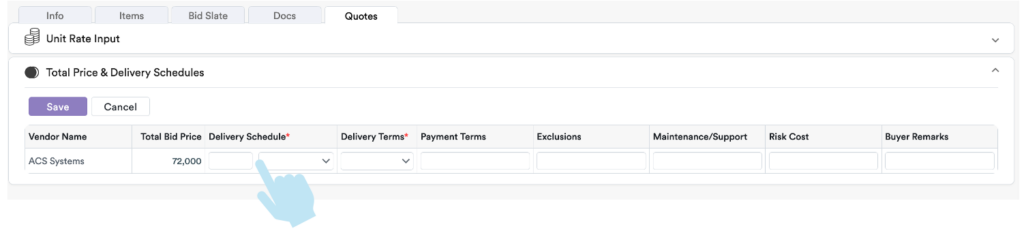
Image 1.21: Delivery information input
After filling the input data Delivery Schedule & Delivery Terms click the “Save” button.
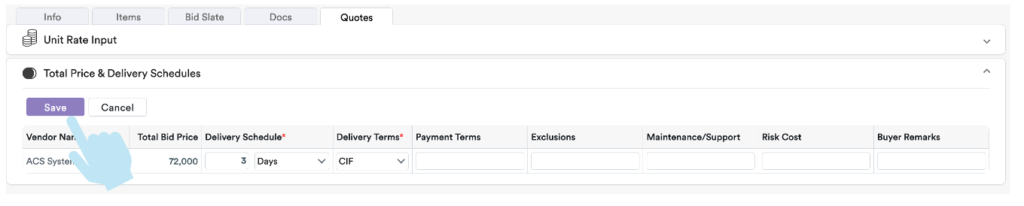
Image 1.22: Saving delivery information
Evaluation Stage-2: Analysing quotes
After inputs are made in the quote tab; you can start the Evaluation.
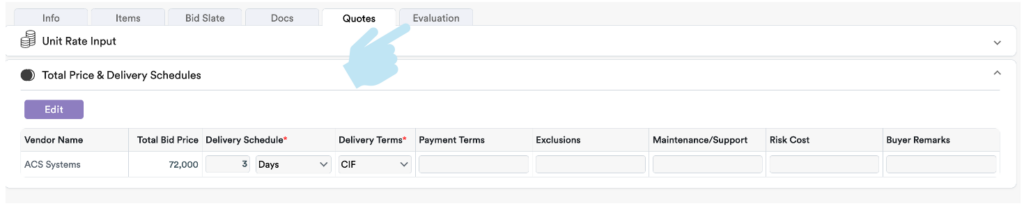
Image 1.23: Evaluation tab
Evaluation feature helps you compare vendor quotes based on price, quality, delivery, and compliance. This ensures transparent and fair selection.
To generate the automated comparison matrix, you need to click the “Run” Button which you can see. After click Run button, you can see the Cost simulation.

Image 1.24: Running evaluation algorithm
- Evaluate Currency: Specifies the currency in which vendor quotations will be evaluated (e.g., USD, INR).
- Budget: Indicates the estimated or approved financial limit for the procurement.
- Bidder Invited: Shows the number of vendors who have been invited to participate in the bid.
- Bidders Quoted: Displays the number of vendors who have submitted their quotations.
Evaluation Stage-3: Comparison matrix
The Comparison Matrix is generated automatically by the system that helps you to take the right decision across multiple parameters in a error-free, structured and visual format.
💡Tip: System will recommend the best Evaluation Strategy for the quoted price using standard practises in the industry.
🧠 System-Suggested Evaluation Strategy
In the system automatically suggests the best evaluation strategy based on the nature of the bid, vendor responses, and procurement priorities.
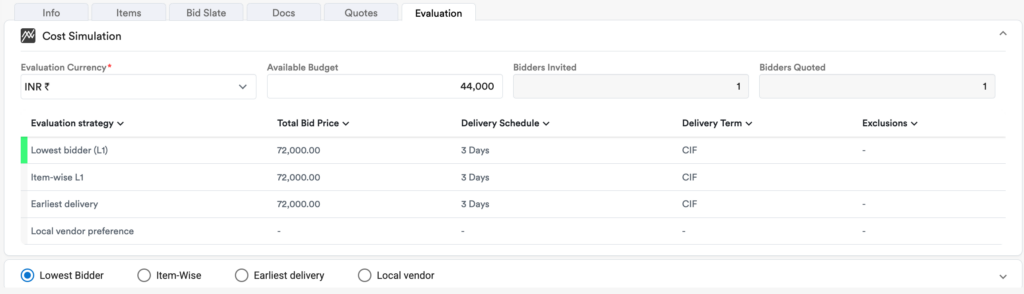
Image 1.25: Evaluation result
Evaluation Strategy method:
- Lowest Bidder
- Item-Wise lowest
- Earliest delivery
- Local Vendor preference
Lowest Bidder:
Refers to the vendor who has submitted the lowest total quoted price for the requested items or services. This is often used as a primary selection criterion in cost-driven procurement processes.
💡 Note: Lowest price doesn’t always mean best value—other factors like quality and delivery terms should also be considered.
Item-Wise:
Evaluation is done per item, allowing selection of different vendors for different items based on best price, quality, or delivery. This approach is useful when no single vendor offers the best deal across all items.
Example: VendorA may be selected for Item1, while VendorB is chosen for Item2.
Earliest Delivery:
Highlights vendors who offer the shortest lead time or earliest delivery date. This is critical for time-sensitive procurements or urgent operational needs.
Use this to prioritize vendors who can meet tight deadlines or have local stock availability.
Local Vendor:
Indicates whether the vendor is based in or registered within the target region or country. Preference may be given to local vendors for reasons such as faster delivery, lower logistics costs, or compliance with local sourcing policies.
Some organizations have mandates or incentives to support local businesses.
Evaluation Stage-4: Decision Making
You can choose the evaluation method you think is right, if not happy with system recommended result. It’s fully compactable, system allows you to make changes.
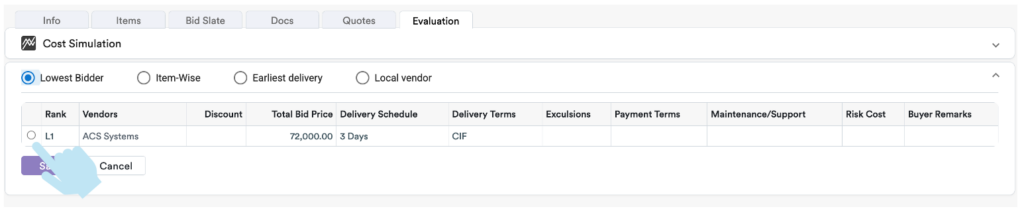
Image 1.26: Choosing Evaluation for decision making
You can select prepared evaluation strategy while clicking the check radio button and hitting the “Save” button you can see a text message appear with winner of the Bid.
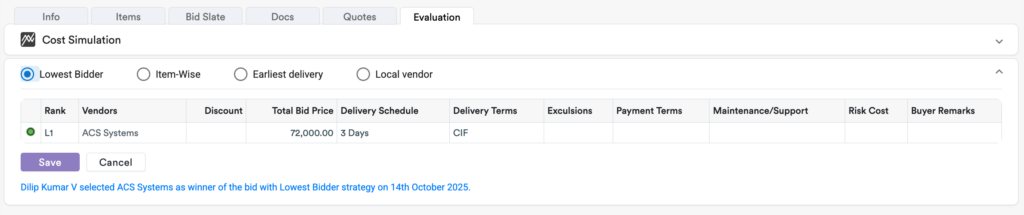
Image 1.27: Finalisation of winner
Approval workflow:
The Workflow function in Axia enables structured, traceable and flexible routing of documents for review and approval. It ensures that all requests follow the appropriate authorisation path prior being published to the buyer team.
Workflow Button Availability
The workflow button becomes visible only after material items are mapped. However, initiating it is recommended until the form is fully completed, including:
- All mandatory fields filled, Supporting documents uploaded
- Required material/service & delivery details provided
This ensures that only complete & well-documented requests are proceed.
Submitting for Review
Once the requisition is ready:
Users can click the “Submit for Review” button that appeared in the requisition header to initiate the workflow.

Image 2.1: Workflow button
When this button is clicked, a pop-up container allows you to configure the approval flow dynamically, selecting the appropriate reviewers and approvers based on internal policies, department, value thresholds or specific needs.
Users may choose signers and approvers with review and approval steps either sequential or parallel.
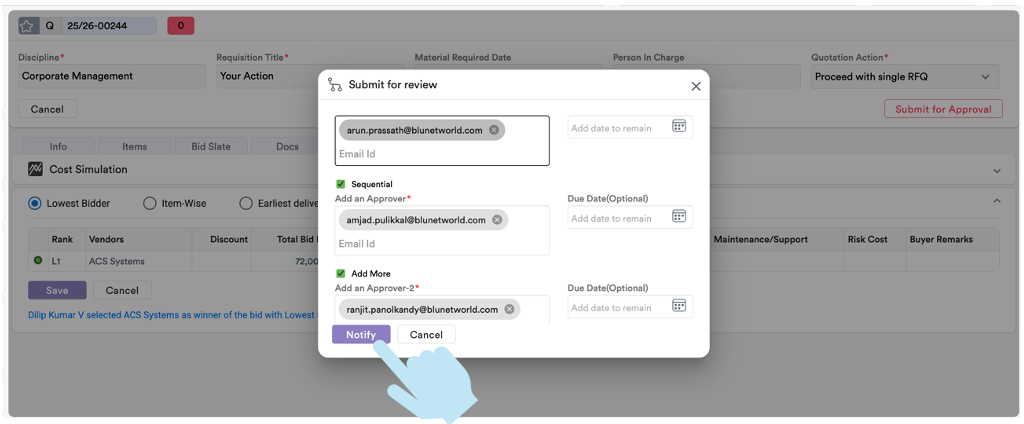
Image 2.2: Workflow is ready to launch
Notifications & Approver Actions
Assigned reviewers and approvers receive automated email notifications when a requisition requires their attention. They can log into the platform to review, approve, reject or request changes to the requisition.
All actions taken are recorded in the History tab for full traceability. User can also see the status of review in the header.

Image 2.3: Workflow status in header
Post-Approval Processing
Once the requisition is fully approved: the associated documents and requisition details are automatically published to the buyer or procurement team.
This triggers the next steps in the procurement cycle, such as vendor engagement, purchase order creation or goods ordering.
✅ Best Practices for Users
- Be specific: Vague descriptions can delay approvals.
- Attach supporting documents: This reduces back-and-forth interactions with approvers.
- Double-check quantities and pricing: Prevents budget mismatches.
- Use drafts: If you’re waiting on vendor quotes or internal approvals, save your work without Submitting for Review (workflow) and return later.